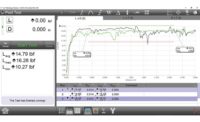
Computers and software play a major role in force measurement and quality control. Whether in the engineering lab, quality control inspection area, receiving inspection or on the production floor, the use of computers and measurement software are beneficial to product quality and production efficiency.
But with computers and application software comes a variety of ongoing support requirements, often involving IT personnel and ranging from ensuring the current software drivers have been installed to operating system updates to security requirements that prevent unauthorized modifications, to test setups and measurement results.
Software validation and conformance to regulatory requirements, such as 21 CFR Part 11, rightfully add layers of complexity to many testing applications and production operations where computers and software are involved. Supplier enhancements to their software, even modest upgrades, place a continual demand on IT resources with the possibility of impacting the operation’s throughput while validation and verification of new software are performed.
Force Alternative
Force gages have long been a valuable instrument for force measurement applications. Force measurement testing is an essential process for product designers and manufacturers to gain insightful data and create high quality and ergonomic products. As consumers, we are accustomed to applying a certain amount of force to complete everyday tasks. Even simple motions, such as turning the key in a car’s ignition or pressing a button on a remote control, requires a very specific amount of force to be applied. From an engineer’s perspective, the amount of force required to complete these tasks is not coincidental. In fact, these requirements are carefully planned during the product development process. Whether this is to accommodate human ergonomics or to meet product safety regulations, manufacturers will complete a thorough force measurement process for every product they design. Historically, force was calculated by using a series of mathematical equations, known as Newton’s first, second and third law.
Accuracy is imperative for the development of high quality and ergonomic goods, especially in a climate where end users have come to expect seamless performance from both consumer and industrial devices or machines. Modern force measurement systems need to meet the exact requirements of research scientists, design engineers, quality managers and the technicians responsible for material characterization, verification and validation of products.

Modern force measurement systems need to meet the exact requirements of research scientists, design engineers, quality managers and the technicians responsible for material characterization, verification and validation of products.
Product functionality in force gages has expanded greatly in the past 20 years. Gages can now detect break forces or can be used for averaging forces and determining measurements such as coefficient of friction. Force gages have an inherent benefit, in that their software is embedded. While provisions are still necessary when software updates are made, the demands on resources and the effects of external issues are generally much less of a concern. In many organizations, the use of force gages in lieu of computers and measurement software, are preferred both from a usability standpoint and because these well-known and proven instruments are cost-effective and application-specific. And while force gages may have specific capabilities compared to the versatility that computers and application software have, they continue to be extremely reliable and their functionality is continually evolving. Compared to computer-software based systems, force gage systems are significantly easier and less costly to maintain with a high degree of security against unauthorized changes, viruses, malware etc.

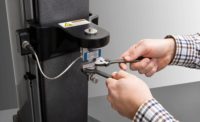
A digital force gage offers a real time view showing active load being applied to the load cell. The secondary window shows the measured peak in tension made - 36.51lbf.
Automation Advantages
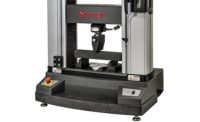
Automated testing, such as using a force gage with a digital force testing frame, has been commonplace in modern manufacturing operations. In this scenario, the force gage is set up to measure the maximum force (peak force), or to measure and display the force result after the test frame’s crosshead has moved for a specified distance. The user configures the force gage and the test frame independent from one another. At the completion of the test method, the test frame may display the active crosshead travel and current speed and the resulting distance.
Communication between the force gage and test frame is typically via RS-232. The gage and test frame may require a communication protocol setup such as baud rate, word length, stop bits, etc. Mechanical travel limits are used on the test frame to help prevent accidental overloading of the force gage’s internal load cell sensor. At the conclusion of the test, the user reads the force results on the gage and the distance result on the test frame.
Often, the independent results for force and distance need to be manually combined and used later in a separate application for reporting, such as merging data from two sources into an Excel spreadsheet. So, while the force gage-force tester represents a fairly simple system configuration, there are a variety of pre-test setup requirements and post-test activities involved, leaving a risk of incorrect setup or problems with data integrity.

Force gages can function as a force gage and a controller. The controller can be used to measure load and control the test frame, creating load, distance and break limit test methods in seconds.
Ensure Data Integrity
Solutions are now available that extend the traditional force measurement functionality of a force gage. For example, there are force gages that function as a force gage and as a controller for a digital force tester. With this technology, the user only needs to set up the gage since the gage has built-in testing templates for common force measurement test methods. Users can perform load limit, distance limit and break limit testing. Within each test method, the user specifies the digital force tester functionality by using the gage. The user specifies the direction of crosshead motion, the crosshead velocity and functions such as automatic zero of both force and distance prior to the actual testing, as well as automatic return to zero position once the test has concluded.
The gage also displays both the force measured by the internal load cell sensor as well as the crosshead distance traveled during and at the completion of the test. When setting up the gage to perform a distance limit test, the gage is used to enter the distance limit and test velocity. The test is started by pressing a key on the gage. During the test, the gage displays the active force and the active distance in SI units of measure or imperial. The target setpoint limit is displayed so the operator knows the status of the test. At the end of the test, the gage displays both the load at the target distance and the distance. If a tolerance limit is used for pass/fail indication, the result is shown in red text indicating a failed result. If performing a break limit test, the gage will display the maximum force and the distance at maximum force for the break event.
There is certainly a place for computer-software based systems for force measurement and analysis. These systems offer test method flexibility, analysis and reporting. But they also require a higher level support than force gage-based systems. Now an affordable and easy-to-use testing system for common force measurement applications exists. Users get the performance of a computer-software based system without the concerns and support requirements often associated with traditional systems.


